As a professional editer and videos maker for Mac, iMovie get Mac user's approval. And as a most famous videos sharing site, YouTube has a deep mass base of users. Some users may upload videos to YouTube from iMovie but without success, because most YouTube videos are normally in FLV format which are not supported by iMovie. But no need to worry. Here will share tips with you on how to put a movie onto YouTube in iMovie iLife 06' and in iLife 11'.
- Part 1. How to Upload videos to YouTube from iMovie HD (iLife '06)
- Part 2. How to Upload videos to YouTube from iMovie (iLife '11)?
- Part 3. How to Download YouTube Videos to iMovie?
iTube Studio - YouTube to iMovie Downloader
If you are in the need to download YouTube videos to iMovie for editing and then upload to YouTube again later, you can download iTube Studio and start to download YouTube Videos with one click.
- iTube Studio allows you to download videos in batch and convert many videos at once at a fast rate.
- Downloadws movies can be directly converted to ant format you need.
- You can leave your Mac on to download videos, and you can let it shut down automatically or enter sleep mode when the download is finished.
- It supports to manage and play your Mac videos with its built-in player.
Part 1. How to Upload videos to YouTube from iMovie HD (iLife '06)
Tutorial for Uploading videos to YouTube from iMovie HD
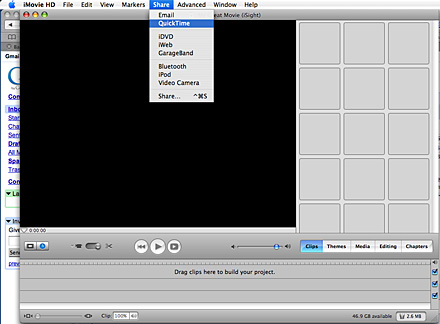
Step 1. Prepare your video that you want to upload, go to the menu bar, then hit the share button. Choose the QuickTime option.

Step 2. Hit the menu for compression options and choose web.

Step 3. After that, save your video to the desktop or other file folders. Locate your video and hit it once then click on apple+I to get the information of your video. Your video should be less than 100 megabytes so that YouTube will accept it. Enter YouTube, go to the top of the page and press the "upload" button.
Step 4. Enter information of your video, including the name, category, tags etc. After you entered the information of your video, then click on the "upload a video" button. Press the "Choose File" button and choose your video file. Confirm that it's your compressed QuickTime video and not the iMovie file. In the end, hit the "Upload Video" button, your video will be uploaded in a few minutes andit will appear on YouTube in several hours.
I also recommend CD quality. You can save the movie to CD-ROM and then you can upload movie from iMovie HD to YouTube!
Part 2. How to Upload iMovie videos to YouTube (iLife '11)
Tutorial for Uploading iMovie videos to YouTube (iLife '11)
Step 1. Prepare the video that you want to share, then go to the menu bar and hit the share button and choose YouTube. Choose or create your YouTube account.
Step 2. Confirm your sign in. Choose the information of your video, such as the category, name, description, and tags. Choose the publish size of your video and then press the Next button. Now click on the publish button. Your video will be ready to watch on youtube in 2-120 minutes.
Still Confused? Try this video in Apple's website. It's a video tutorial for sharing from iMovie '08.
Google has released basic software called Vidnik which is the quickest, simplest way to make movies using the built - in camera on your Macintosh and upload those movies to your youtube account. You must first sign up for a free youtube membership to upload videos.
Part 3. How to Download YouTube Videos to iMovie
You want to watch YouTube videos, but you don't wish to stream them? Would you like to access your favorite YouTube videos offline, from anywhere and at any time? This article shows you how to save YouTube videos to iMovie, with the help of iTube Studio for Mac. Don't know what iTube Studio for Mac is? It's the top-rated program for downloading online videos from YouTube and other 10,000+ video streaming sites at 3X faster speed.
The software is also an excellent video converter and enables you to convert downloaded and desktop videos to any audio or video formats you can think of. Moreover, it supports batch download and conversion of online videos. In this tutorial, we have outlined not only how to download YouTube videos to iMovie, but also how to convert your favorite “downloaded and/or imported videos” to any iMovie format for fast and free.
Step-by-step Guide to Download YouTube Videos to iMovie
Step 1. Launch the Program
Go to the official website and download iTube Studio for Mac. Drag the downloaded setup file to "Applications" to install it on your Mac. On completion of the installation process, double-click the software's icon to launch it.

Step 2: Download YouTube Videos
Launch Chrome, Firefox or Safari and go to YouTube.com. Identify the YouTube video you would like to save to your Mac and start streaming it. A "Download" button will then appear at the top left corner of the video once it's detected on the web page. iTube Studio provides you with three ways to download the video to Mac.
i. Click the "Download" button and select the quality of the video you want to save to your Mac, (1080p, 720p, 480p, 360p and more). The download process will then start automatically.

ii. Drag the YouTube video's URL to the software's dock icon from the address bar.
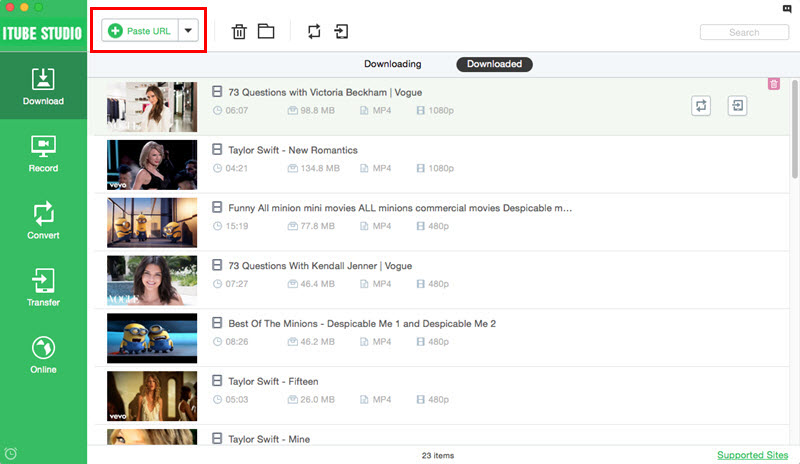
iii. Copy the YouTube video URL and then select the "Paste URL" button located at the main window. The software will then capture your video immediately.

Step 3: Convert YouTube to iMovie Formats
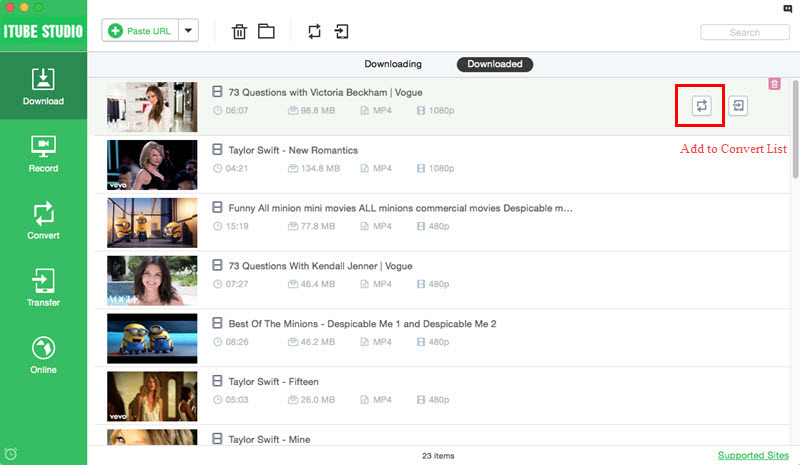
You can access both the downloaded and imported videos in "Downloaded" tab, then Click the "Add to Convert List" icon which is located on the right side of each video. In this way, you have sent your video to "Convert" menu for conversion.

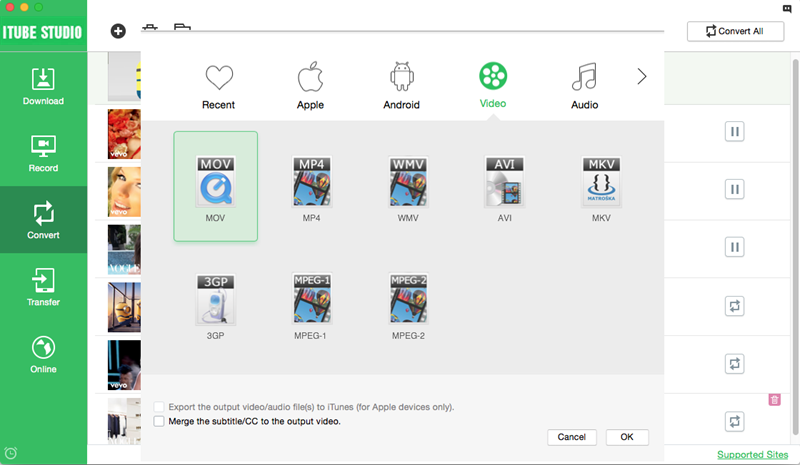
Open "Convert" menu, you will find your video list and you can find a "Convert" icon on the right of your video, click this icon and in the opened format choosing window, you can select your preferred iMovie output format to convert the YouTube videos.


